


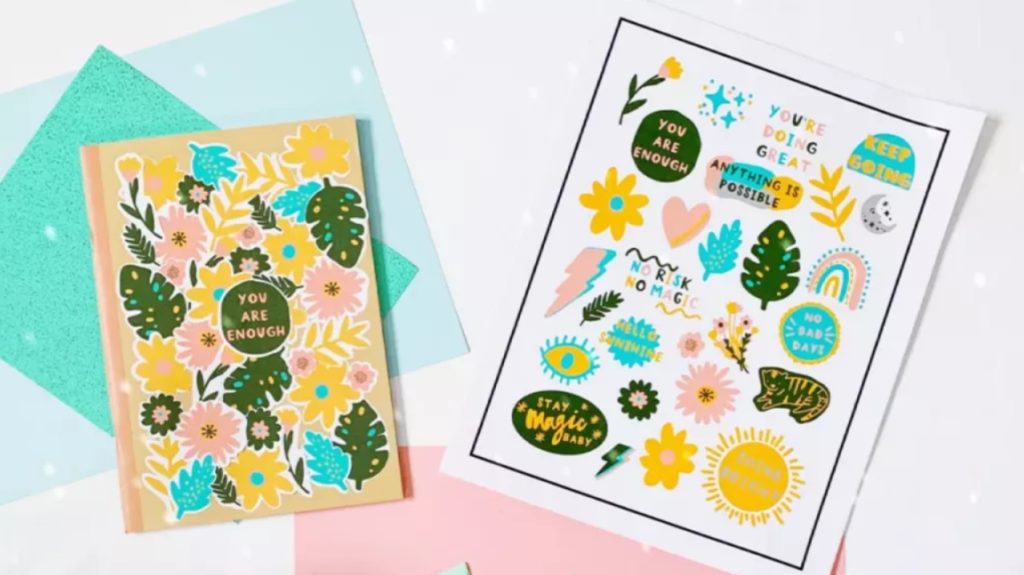
Learning a way to create stickers with Cricut are often fun and simple. Stickers are creative, versatile and may be any form and size you like. Stickers can be used for pretty much anything, they’re nice for personalising your items, however they will even be an honest tool for businesses who wish to extend complete recognition. during this tutorial, we are going to show you only however easy it’s creating stickers with Cricut.
Cricut stickers are typically created victimization adhesive paper. this can be then written on and can be move size. The Cricut makes this method even easier as it permits you to form numerous different-sized stickers, that it then like an expert cuts, feat you with professional-looking stickers. Stickers may also be created victimization vinyl, PVC and even foil.
If you’re still questioning which machine is best for you, inspect our round-up of the most effective Cricut machines. we tend to are using the Cricut Print Then Cut function, which also needs an inkjet printer, however it’s attainable to draw your styles using the best Cricut pens, simply set your pictures to ‘draw’ once you’re in style Space.


This guide can show you just however simple it’s to {create} your own custom stickers with a Cricut. You’ll want some sticker paper, associate inkjet printer, a Cricut machine, a Cricut mat and access to Cricut style Space. For this tutorial, we tend to’ve used pictures from Cricut Access to make our stickers, however you can, of course, create your own image in reproduce or Canva. inspect our guide to the most effective software package for Cricut for additional options.
For this tutorial, we are planning to be victimization Cricut printable sticker paper, that has been designed to figure with the Cricut Print Then Cut function. owing to the scale of the stickers you’ll have to be compelled to use the Cricut Explore or Cricut Maker for this task. what’s Print Then Cut? {this is|this is often|this are often} simply a picture that you simply style in style Space, then print on your inkjet printer before running through your Cricut for it to chop out the shapes.
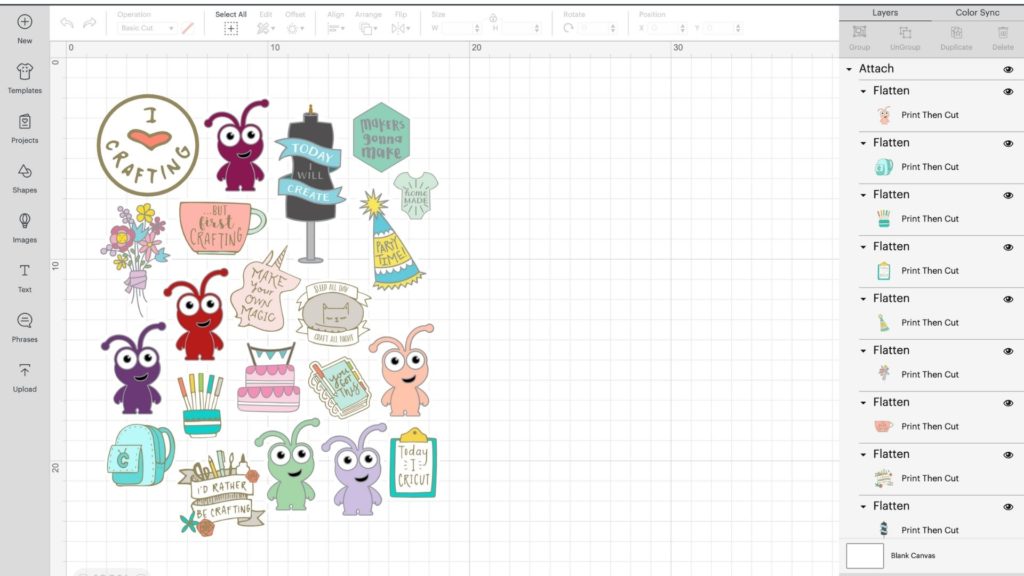
Any pictures can be became printable images by ever-changing the road kind. the road type tells your machine a way to work with completely different materials. If you wish a multi-layer image, for example, different colours, you want to use the flatten tool found within the layer panel, which can convert your image to one layer with a print line type, and it’ll be able to send to your printer. Now, let’ teach you {ways|you the way} to form stickers with Cricut.
a way to make stickers with Cricut, the straightforward way
01. gap Cricut style area
once learning how to make stickers with Cricut, you initially have to be compelled to open Cricut style area and begin a brand new canvas. you’ll either transfer your own design or use a picture from Cricut Access. For additional projects, scan our guide to the most effective free SVG files for Cricut. If you transfer your own design, confirm you flatten the image before rummaging to subsequent step.
Print Then Cut features a most size of 6.75 x 9.25 inches on an 8.5 x 11-inch sheet of material. the simplest thanks to make sure your sticker pictures work is to use a sq. from the shapes library and size it to 6.75 x 9.25 inches.
you’ll then prepare your stickers, and once you’re happy you’ve stuffed the space, delete the square. You will then have to be compelled to highlight the pictures and confirm that Print Then Cut is chosen within the operation section, that you’ll notice on the highest bar. while the images are highlighted, click attach in the layers panel, which can keep all of them in situ for subsequent stage.
02. putting in the printer
We’re virtually able to create our Cricut stickers. Once you’ve got your images in place, it’ time to pick your machine from the top menu and click on the create It button. you’ll notice that a lined recorder will surround your design. This box are going to be printed, and {also the} Cricut sensors scan it, therefore the machine is aware of specifically wherever to cut.
Next, click Continue, where you’ll be ready to send it to your printer. once you click Print, you’ll be able to choose the Add Bleed function. once this can be selected, the ink is extended slightly on the far side the image’ border, that eliminates the white margin when the image is cut. However, if you wish your image enclosed by a white margin, flip this off.
you’ll also prefer to turn on System Dialog, which can permit you to access your own printer settings, providing you with the choice to regulate the settings for the most effective print quality.
03. Printing and adding to the mat
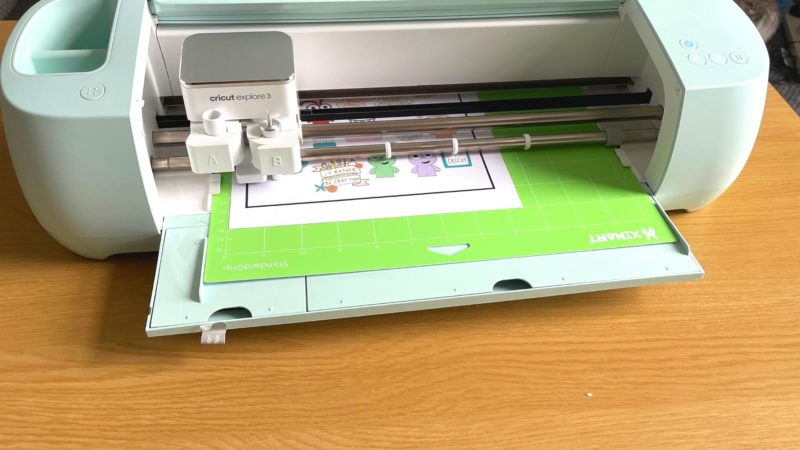
subsequent step of however guide to a way to create stickers with Cricut includes your printer. This method solely works with an inkjet printer; we’ve got a listing of the best art printers if you’re wanting to upgrade. you’ll have to be compelled to check that high your printer ought to be loaded. Add your chosen printable material to the feed and click on Print.
Once your sheet has been printed, you’ll have to be compelled to add it to a mat, lining up the highest of the paper with the top left-hand corner. albeit you’ve got a machine that uses sensible Materials, you’ll still need to use a mat for this project. we tend to advocate a LightGrip mat as you’ll need to be ready to take away it easily.
04. choosing your material and acquire scanning
In Cricut style Space, you would like to inform your machine what sort of material you’re using. we tend to used the Cricut printable Sticker Paper, so we tend to simply explore for that within the search bar. however if you’re not victimization the official Cricut paper, choose the sticky note setting. we’ve got an entire guide to the most effective Cricut materials, together with papers for stickers.
A high tip if you’re aiming to make Cricut stickers frequently is to click the star next to the current material, that then adds it to your favourites. Once it’s in your favourites, it’ll prevent many time exploring through the materials whenever you wish to make stickers.
subsequent step is to line your felt and click on Go. The machine will live the mat length and can then use sensors to scan the black lines before cutting round the individual images. And that’s it. Your stickers are going to be able to peel off and use wherever you like.
a way to create stickers with Cricut: tips and recommendation
creating stickers with Cricut is very easy and once you get wont to it you’ll whizz through the method in no time. however there are some things that you simply have to be compelled to know. Here we tend to list our tips for creating stickers with Cricut.
01. detector not working? Check the sunshine
If your machine is throwing up miscalculation once it’s within the scanning stage it might be to try to to with the light conditions in your room. Direct daylight or bright lights shining directly towards your machine can interfere with the machine sensors. The sensors work best in low light therefore simply draw the curtains or flip the light out before it starts scanning.
02. perpetually check Cricut’ activity
Cricut’s are sensible cutting machines however generally they have a bit help. If the cut isn’t quite right then head to the settings menu and follow the Print Then Cut activity steps. The calibration sheet has to be written in black and white and printed in actual size to be successful.
03. Print Then Cut in one go
once you begin a Print Then Cut project confirm to try to to it on identical laptop and in one head to avoid the planning jumping around and also the detector marks being incorrect. Take a glance at our reviews of the most effective portable computer for Cricut to ascertain that computers we tend to recommend.
04. wherever you place the fabric matters
we tend to mentioned higher than that once you place your material on the mat it has to be placed within the top left corner of your cutting mat. Line this up directly on the highest left fringe of the cutting mat. confirm the material is flat and doesn’t have any wrinkles or bubbles. If the material isn’t placed in the right place then the sensors won’t be ready to find your image and your cut won’t work.
As you’ll see, creating stickers is de facto simple. There are such a large amount of completely different comes that you simply will do with a Cricut, together with creating your own mugs, scan our Cricut Mug Press review for more, or cut HTV vinyl and create your own custom t-shirts with a Cricut EasyPress (we have a guide to the most effective heat press machines).